Showing posts with label the DIY. Show all posts

Tuesday, October 4, 2011

Where are you sitting?–Part 2

In conjunction with our personalized menus I wanted to create a seating chart to let our guests know which table they would be sitting at.

You may remember that we decided to letter our tables instead of numbering them and we spelled out “Me & You.”  We had a friend take pictures of us holding the letters that would be a part of the table centerpieces.IMGP3480I also had a frame that I had purchased from Pottery Barn years ago.  I had originally wanted to peel the labels off of wine bottles and put them in a frame.  When I found the peeling of labels trickier than expected the frame sat sad and unfinished for five years.IMGP3666Finally I had a new purpose for it!

I trimmed the photos and glued them on the same purple cardstock I used for our menus.  Time to check for layout and placement!IMGP3661I glued them on to a new piece of thick cardstock backing.  I then handwrote everyone’s names under the lettered table that they would be sitting at.

Here is the seating chart on display at our wedding:

6-reception-002Photo by the amazingly talented Sakura Photography

It was another really simple project, but it really tied all of the elements of our tables together.  From our milk glass, our centerpiece photos…

6-reception-016Photo by Sakura Photography

our letters…

6-reception-017Photo by Sakura Photography

and our personalized menus.

6-reception-020-editPhoto by Sakura Photography

What are you doing for your seating chart?

Sunday, October 2, 2011

Where are you sitting?

Mr. Gazelle and I talked about all kinds of seating options for the wedding.  We contemplated designating tables for our parents but then leaving the seating for everyone else open.  I  then had visions of friends or family not being able to sit together if they weren’t on the ball about picking seats.  I figured they wouldn’t be too happy about that.  Coming up with a seating plan is one of the trickiest things in the end stages of wedding planning.  I quickly realized that while we maybe couldn’t make everyone happy it would be better in the long run to let everyone know where they were sitting.

So…what would be the best way to tell everyone?  I wasn’t feeling creative on designing escort cards.  Instead I decided personalized menus would be the way to go!  This way our guests would know what yumminess was waiting for them at the buffet and it would also let our gluten free guests know that we had special meals for them.

I picked up a few more sheets of the same gorgeous sparkly white paper that we used for our invitations from Paper Circle and some purple cardstock from Michaels.  I printed the menus off on our laser jet printer at home and assembled them one weekend with the help of my girlfriends.6-reception-024I used Travelling Typewriter and Pea Charmaine for the fonts.  Our coordinator then folded the napkins to be like little pockets for our menus.6-reception-023All together!6-reception-021It was a really simple project but I loved how it looked.

How did you decide to let your guests know where they were sitting, or did you decide to go with open seating?

*All photos courtesy of the supremely amazing Sakura Photography*

Monday, September 12, 2011

Making Memories for my Bouquet

I had a few special people that I wanted to remember on my wedding day who are no longer with us.  I’ve lost three of my grandparents and I lost my aunt about five years ago.  In some ways the loss of my aunt during wedding planning was particularly tough.  She LOVED weddings.  She was also my Godmother and I remember one day years ago that she proclaimed to me that she would host a bridal shower for me when it was my turn to get married.  Knowing that she was missing my wedding was difficult.

I was inspired by Mrs. Crab Cake’s post on bouquet charms using Scrabble tiles.  I bought the DIY Scrabble tile pendant kit from Annie Howes.IMGP3385

The kit came with almost everything I needed – Scrabble tiles with letters for the first names of my grandparents and aunt, glaze and heavy duty glue.  I did pick up a different kind of glue to stick my pictures to the tiles though.  I printed off some of my favourite pictures on regular paper on my colour laser jet printer.IMGP3600I added a dollop of glue to the back…IMGP3602And spread it with a foam brush…IMGP3603With the picture stuck on the tile I used an exacto knife to trim…IMGP3605Once dry I added the glaze to the picture on the front of the tile, using a toothpick to deal with any bubbles.IMGP3607The glaze was milky at first…IMGP3610But then dried clear.IMGP3637I used the heavy duty glue in the kit to glue the silver plated balls to the back.IMGP3638I loved how these turned out.  So simple.

How did you decide to remember loved ones at your wedding?

Sunday, June 26, 2011

Framing It

Way back before Christmas I was scouring kijiji to look for potential wedding decor.  I found these pieces of awesomeness for $5 a piece.IMGP2768Gold painted wood frames!

Gold wasn’t quite the style I was going for so Mr. Gazelle used Kilz latex primer directly on top of the gold paint.  He tried to sand the frames, but it was taking some of the detail away.  Instead he primed and wiped some of the paint away with a J-cloth.  He then painted two coats of an antique white semi-gloss (Martha Stewart’s Talc), wiping off a bit to expose some of the gold paint below.IMGP3618We wanted to turn a couple of the frames into chalkboards so I purchased 8 x 10 artist canvas at Michael’s at some black spray chalkboard paint.  After a couple of coats we were good to go!  I then glued them inside the wood frames with wood glue.IMGP3620I picked up a pretty mug to hold chalk and an eraser.IMGP3627Overall a simple project but these will be a lot of fun as props for photos at the wedding!

Saturday, March 19, 2011

Never Give Up!

Or this post could alternately be titled:Picture1You may remember that a couple of weeks ago I decided to make a mock up of our invitations.  The only thing that I wasn’t happy with was my attempt at embossing.  Just to refresh your memory, here was the result that I wasn’t please with:IMGP3086I used white embossing ink with opaque white embossing powder.  I didn’t like all of the flecks of white embossing powder that clung to the black cardstock despite a vigorous tapping on the table and blowing on the cardstock.  I didn’t want to give up on the bicycle stamp because this was going to be my attempt to tie a lot of our paper products together.

My friend Julie suggested stamping with regular silver ink which sounded like a good compromise.  BM-D encouraged me to not ditch the embossing completely though because she really liked the raised texture.

I decided to try two different embossing powders – a purple and a pearly white.  First up is purple!IMGP3095This definitely looks a lot cleaner.  It is a little dark on the black cardstock in real life, although it does photograph really well!

Next up I tried a translucent pearly white embossing powder on white ink.IMGP3113This one also turned out pretty well.  I like the contrast between the white picture and the black cardstock.

I’m a lot happier with how these two different powders turned out.  The big question now is which one to go with?  Which do you prefer – the purple or the pearly white?

Monday, March 7, 2011

Embossing Fail

This weekend I finally got around to making a mock up of our invitations.  I ordered supplies ages ago from the absolutely amazing Paper Circle.  Paper Circle is based in Canada, has fantastic prices and some of the most amazing customer service I’ve experienced.  Plus their products are top notch!

I wanted to make a mock up so I could know if:

  • The design in my head would translate into the real thing like I hoped.
  • I could print on beautiful shimmery paper with our laser printer.
  • My ideas would work without having to sacrifice oodles of supplies.

All in all I was really happy with how my mock up turned out.  The laser printer did a great job on the shimmery paper.

There was however one thing that didn’t work out.Picture1Embossing was a bit of a fail.IMGP3086I love the idea of a white embossed graphic on black, but check out how messy it looks.  The edges are not crisp and there is white embossing powder flecked around the image.  After using the embossing heat tool to set the powder the cardstock warped.  I was not pleased with the result.

I’m worried about wasting a lot of cardstock to make the embossing work.  I’m also a bit of a perfectionist and I’m not so keen on sending the invite out if the embossing is going to look like this.  I’ve tried this stamp on different surfaces before (envelopes, magazines) and it turned out really well so maybe the powder is sticking to the cardstock?

I’m leaning towards ditching my plan to emboss something on our invitations.  Do you have any suggestions on what I can do to make this work?

Thursday, February 24, 2011

My DIY Hair Flower–How To Guide

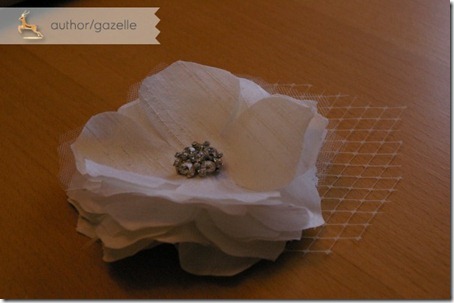
In my last post I showed you my hair flower, not let’s talk about how I made it!

First off, here’s what I used:

  1. Silk dupioni (I bought 0.4 meters, but 0.2 meters would have been plenty)
  2. Tulle (0.2 meters)
  3. French veiling (1 yard, 9 inches wide, purchased from GS Boutique on etsy)
  4. Vintage rhinestone pin
  5. Fabri-Tac adhesive
  6. Peony template (you may want a few print outs)
  7. Needle, pins, matching thread, scissorsIMGP2671

First up, I cut the silk into strips just wider than the flower, folded it up and pinned the template to it.  I wound up using about 9 layers of silk flowers as I wanted a full flower, but I didn’t want so many layers that the fascinator would be really heavy and prone to falling out or weighing down my hair.IMGP2678I then repeated the process with the tulle.  I used two layers of tulle between each layer of silk.
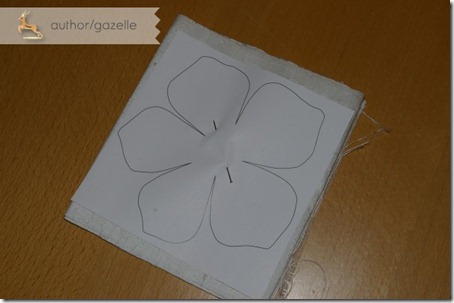
The silk I used was prone to fraying at the edges, so I decided to use fray check around the edges of each flower.  The fray check also has the benefit of giving the flowers a bit more structure so you can define the layers rather than having them flop down against each other.IMGP2683IMGP2686I then assembled all of the layers, making sure the layers didn’t align perfectly and alternating two layers of tulle between each layer of silk, finishing with silk on the bottom.IMGP2688

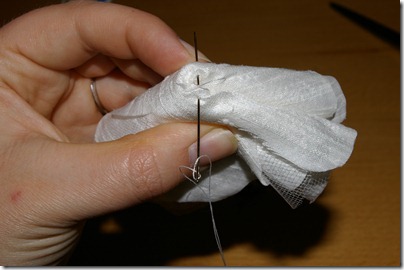
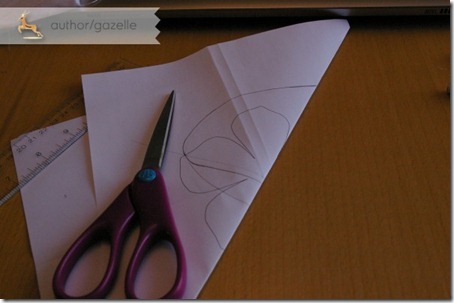
I then ran a few stitches through the center of the flower.IMGP2689Now fold the flower in half, and then in half again, with the bottom layer staying on the outside of the fold.  Run a few stitches through the corner of the fold to help give the flower a bit more shape.  Unfold.IMGP2707IMGP2708IMGP2707Turn the flower over to attach your embellishment to the top of the flower.  The benefit of using a brooch was that I could just thread it through the center of the flower.IMGP2691Now it was time to design the French veiling leaf for the flower.  I drew a leaf on another copy of the template.IMGP3037I wanted the leaf to be symmetrical so I folded the paper in half and only drew half the leaf.  I wanted to curve the bottom of the leaf that would attach to the underside of the flower so I grabbed my compass from university.  This is by no means necessary of course.  Fold in half and cut!IMGP3039IMGP3042I then pinned the leaf to the veiling, making sure the tip of the leaf lined up with one of the tips of the diamonds in the veiling.  Trim.IMGP3043I attached the veiling to the back of the flower with just a couple of stiches.  It will get tacked down a bit better soon.IMGP3048I needed a way to attach the hair clip to the back of the flower so I cut out a circle of silk big enough to attach the clip to.IMGP3049I used fabric glue (Fabri-Tac) to attach the top of the clip to the fabric circle.  Once it was dry I put a spot of glue in the center of the circle and a ring of glue around the outside.IMGP3050I glued the circle down, making sure there was enough play to allow for popping the clip open and closed.IMGP3051And that’s it!  At the hair trial I’ll determine if I need to add in a few stitches here or there but I honestly think it is good to go (that Fabric-Tac is strong stuff).IMGP3053IMGP3056And here’s a cost breakdown for the project!  I’m not including the cost of the fray check, fabric adhesive and basic sewing notions since I already had those on hand.
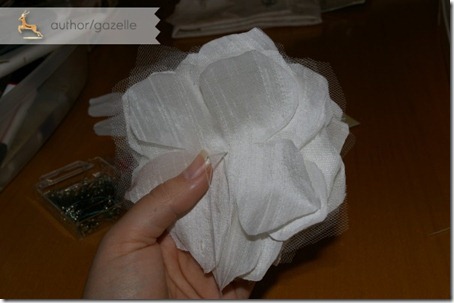
Hair clips = $1.05
Silk dupioni = $11.76 (and I could have sufficed with half the amount I purchased)
Tulle = $1.05
French veiling = $3.71
Rhinestone pin = $10.45
TOTAL = $28.02

I hope you found this tutorial useful!  Have you thought about trying to make your own bridal accessories?